AngularJS入门笔记-11-后台管理系统
前面已经完成了整个运动商店应用客户端的编写,简化了界面设计,只完成了关键的商品展示-加入购物车-下订单流程。现在我们需要晚上整个sports store的流程,那就是开发一个后端管理程序对商品和订单进行管理。
完成界面如下: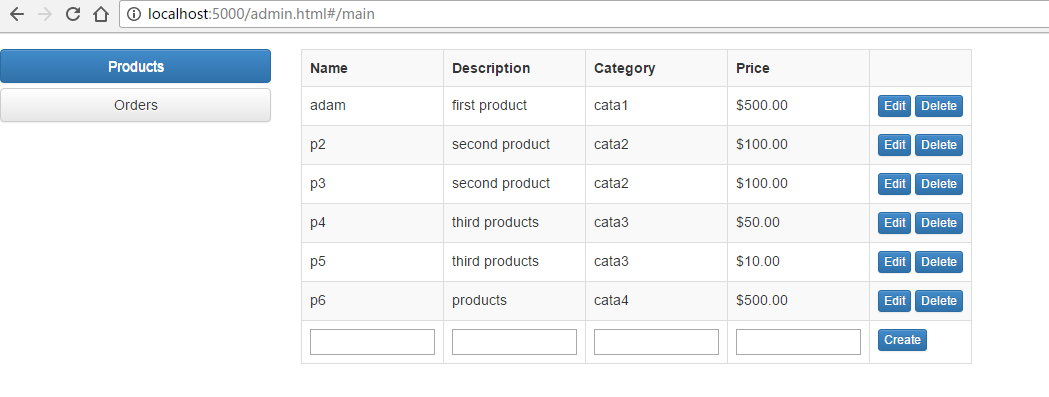
在管理项目中不需要store部分的内容,可以独立开启一个项目,将代码与普通用户端分开
目录组织结构:
1 | angularjs #项目目录 |
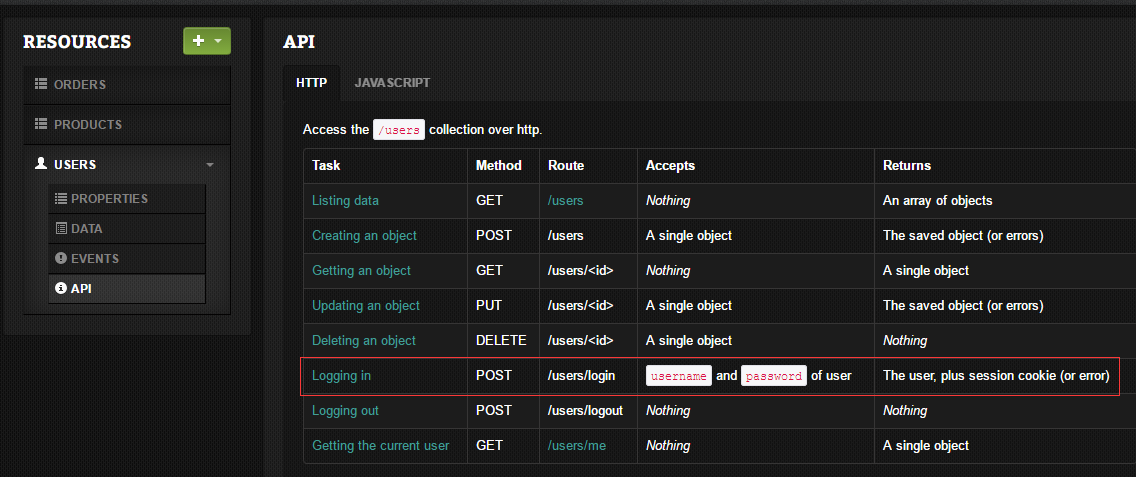
管理员登录页面,分清普通用户和管理员的权限,所以需要对products表和orders表做一些限制,禁止非管理员用户删除或更新,而dpd对这些表的API提供了一些功能,此时可以在dashboard中的表的API对应的方法设置,比如产品接口的删除方法:
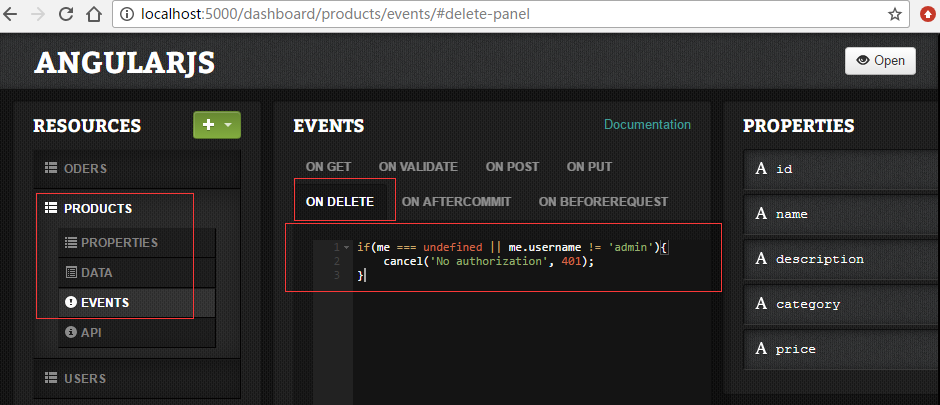
这里输入的脚本是js代码(因为dpd基于node的),同时这里的me表示当前登录的用户。保存后就在会项目目录下的resources文件加下发现对应的表中有相应的js脚本文件。
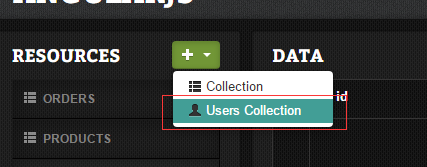
我们有管理员和普通用户的区别,则需要新建一个用户表。使用dpd dashboard中的创建菜单中的Users Collection项,创建的表(dpd会默认设置一些用户字段,如username和password, 同时也会在API中默认预设很多接口,如登录,退出),而不是mongodb数据库的User表(一个全小写,一个首字母大写)。
如下,新建user用户表后,添加一个管理员帐号adminX,密码输入后保存自动为密文
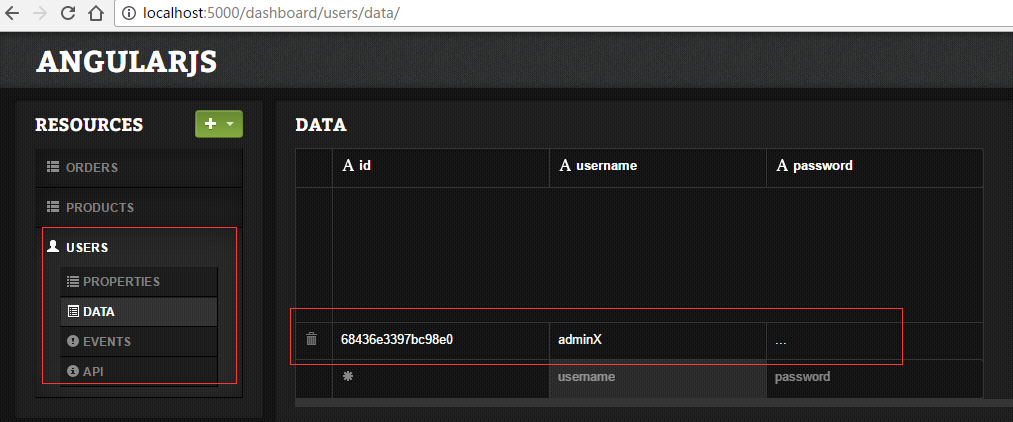
然后此时需要注意这种Users Collection类型的表的特殊之处,如下所示,可以看到登录的接口为/users/login,以及需要username和password两个字段。
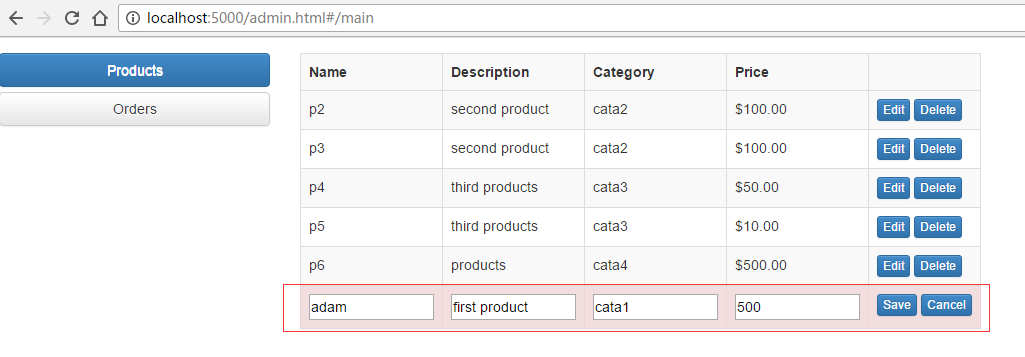
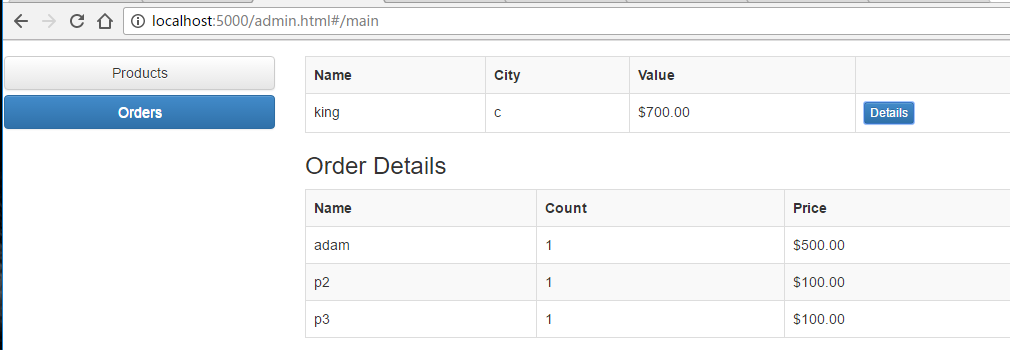
附上完成后的产品界面和订单界面:
后台管理页面的主入口页面admin.html1
2
3
4
5
6
7
8
9
10
11
12
13
14
15
16
17
18
19
20
21
22
23
24
25
26
27
28
29
30
31
32
33
34
35
36
<html ng-app="sportsStoreAdmin">
<head>
<title>Administration</title>
<script src="angular.js"></script>
<script src="ngmodules/angular-route.js"></script>
<!-- 添加resource插件,用于RESTful风格的CRUD操作 -->
<script src="ngmodules/angular-resource.js"></script>
<link href="bootstrap.css" rel="stylesheet" />
<link href="bootstrap-theme.css" rel="stylesheet" />
<script>
// 定义新的管理模块,同时需要使用到路由和RESTful插件
angular.module("sportsStoreAdmin", ["ngRoute", "ngResource"])
.config(function ($routeProvider) {
// 配置路由和视图
$routeProvider.when("/login", {
templateUrl: "/views/adminLogin.html"
});
$routeProvider.when("/main", {
templateUrl: "/views/adminMain.html"
});
$routeProvider.otherwise({
redirectTo: "/login"
});
});
</script>
<script src="controllers/adminControllers.js"></script>
<script src="controllers/adminProductController.js"></script>
</head>
<body>
<ng-view />
</body>
</html>
后台登录视图adminLogin.html, 未登录状态下则进入此页面1
2
3
4
5
6
7
8
9
10
11
12
13
14
15
16
17
18
19
20
21
22
23
24
25
26
27
28
29
30 <!-- 登录视图,设置控制器 -->
<div class="well" ng-controller="authCtrl">
<div class="alert alert-info" ng-hide="authenticationError">
Enter your username and password and click Log In to authenticate
</div>
<div class="alert alert-danger" ng-show="authenticationError">
Authentication Failed ({{authenticationError.status}}). Try again.
</div>
<!-- 登录表单 -->
<form name="authForm" novalidate>
<div class="form-group">
<label>Username</label>
<input name="username" class="form-control" ng-model="username" required />
</div>
<div class="form-group">
<label>Password</label>
<input name="password" type="password" class="form-control"
ng-model="password" required />
</div>
<div class="text-center">
<button ng-click="authenticate(username, password)"
ng-disabled="authForm.$invalid"
class="btn btn-primary">
Log In
</button>
</div>
</form>
</div>
后台主页面视图adminMain.html,登录成功后进入此页面1
2
3
4
5
6
7
8
9
10
11
12<!-- 后台主页面 -->
<div class="panel panel-default row" ng-controller="mainCtrl">
<div class="col-xs-3 panel-body">
<a ng-repeat="item in screens" class="btn btn-block btn-default"
ng-class="{'btn-primary': item == current }" ng-click="setScreen($index)">
{{item}}
</a>
</div>
<div class="col-xs-8 panel-body">
<div ng-include="getScreen()" />
</div>
</div>
订单管理页面 adminOrders.html, 实际生产中,订单管理往往是一个非常复杂的过程,比如支付验证,库存管理,筛选,运输,订单的删除,导出,统计等,此处仅仅实现了一个最简单版本的订单管理,那就是查看订单。1
2
3
4
5
6
7
8
9
10
11
12
13
14
15
16
17
18
19
20
21
22
23
24
25
26
27
28
29
30
31<!-- 订单管理页面, 设置订单控制器 -->
<div ng-controller="ordersCtrl">
<!-- 订单列表 -->
<table class="table table-striped table-bordered">
<tr><th>Name</th><th>City</th><th>Value</th><th></th></tr>
<tr ng-repeat="order in orders">
<td>{{order.name}}</td>
<td>{{order.city}}</td>
<td>{{calcTotal(order) | currency}}</td>
<td>
<!-- 此处对每一个订单都将该订单的全部信息传入selectOrder函数 -->
<button ng-click="selectOrder(order)" class="btn btn-xs btn-primary">
Details
</button>
</td>
</tr>
</table>
<!-- 显示选定的订单详情 -->
<div ng-show="selectedOrder">
<h3>Order Details</h3>
<table class="table table-striped table-bordered">
<tr><th>Name</th><th>Count</th><th>Price</th></tr>
<tr ng-repeat="item in selectedOrder.products">
<td>{{item.name}}</td>
<td>{{item.count}}</td>
<td>{{item.price| currency}} </td>
</tr>
</table>
</div>
</div>
后台管理页面的一些控制器,不含产品管理控制器1
2
3
4
5
6
7
8
9
10
11
12
13
14
15
16
17
18
19
20
21
22
23
24
25
26
27
28
29
30
31
32
33
34
35
36
37
38
39
40
41
42
43
44
45
46
47
48
49
50
51
52
53
54
55
56
57
58
59angular.module("sportsStoreAdmin") // 获取管理模块
.constant("authUrl", "/users/login") // 注意此处的接口是由dpd API中定义的
.constant("ordersUrl", "/orders")
.controller("authCtrl", function ($scope, $http, $location, authUrl) {
// 登录验证控制器
$scope.authenticate = function (user, pass) {
$http.post(authUrl, {
username: user,
password: pass
}, {
withCredentials: true
}).success(function (data) {
$location.path("/main");
}).error(function (error) {
$scope.authenticationError = error;
});
}
})
.controller("mainCtrl", function ($scope) {
// 主页面控制器,其实就是可以切换产品/订单的一个tab
// 定义screen分别有产品和订单
$scope.screens = ["Products", "Orders"];
$scope.current = $scope.screens[0];
// 切换操作
$scope.setScreen = function (index) {
$scope.current = $scope.screens[index];
};
// 获取对应screen界面
$scope.getScreen = function () {
return $scope.current == "Products"
? "/views/adminProducts.html" : "/views/adminOrders.html";
};
})
.controller("ordersCtrl", function ($scope, $http, ordersUrl) {
// 订单管理页面控制器
// 此处的withCredemtials属性确保浏览器包含安全的cookie并随ajax提交到服务器端
$http.get(ordersUrl, { withCredentials: true })
.success(function (data) {
$scope.orders = data;
})
.error(function (error) {
$scope.error = error;
});
$scope.selectedOrder;
// 设置当前选定的订单
$scope.selectOrder = function (order) {
$scope.selectedOrder = order;
};
// 计算订单产品数量总和
$scope.calcTotal = function (order) {
var total = 0;
for (var i = 0; i < order.products.length; i++) {
total +=
order.products[i].count * order.products[i].price;
}
return total;
}
});
产品管理页面 adminProducts.html1
2
3
4
5
6
7
8
9
10
11
12
13
14
15
16
17
18
19
20
21
22
23
24
25
26
27
28
29
30
31
32
33
34
35
36
37
38
39
40
41
42
43
44
45
46
47
48
49
50
51
52
53
54
55<!-- 产品管理页面 -->
<!-- 显示了ng指令如何用于管理有状态的编辑视图 -->
<style>
#productTable { width: auto; }
#productTable td { max-width: 150px; text-overflow: ellipsis; overflow: hidden; white-space: nowrap; }
#productTable td input { max-width: 125px; }
</style>
<div ng-controller="productCtrl">
<table id="productTable" class="table table-striped table-bordered">
<tr>
<th>Name</th>
<th>Description</th>
<th>Category</th>
<th>Price</th>
<th></th>
</tr>
<tr ng-repeat="item in products" ng-hide="item.id == editedProduct.id">
<td>{{item.name}}</td>
<td class="description">{{item.description}}</td>
<td>{{item.category}}</td>
<td>{{item.price | currency}}</td>
<td>
<button ng-click="startEdit(item)" class="btn btn-xs btn-primary">
Edit
</button>
<button ng-click="deleteProduct(item)" class="btn btn-xs btn-primary">
Delete
</button>
</td>
</tr>
<tr ng-class="{danger: editedProduct}">
<td><input ng-model="editedProduct.name" required /></td>
<td><input ng-model="editedProduct.description" required /></td>
<td><input ng-model="editedProduct.category" required /></td>
<td><input ng-model="editedProduct.price" required /></td>
<td>
<button ng-hide="editedProduct.id"
ng-click="createProduct(editedProduct)"
class="btn btn-xs btn-primary">
Create
</button>
<button ng-show="editedProduct.id"
ng-click="updateProduct(editedProduct)"
class="btn btn-xs btn-primary">
Save
</button>
<button ng-show="editedProduct"
ng-click="cancelEdit()" class="btn btn-xs btn-primary">
Cancel
</button>
</td>
</tr>
</table>
</div>
产品管理控制器1
2
3
4
5
6
7
8
9
10
11
12
13
14
15
16
17
18
19
20
21
22
23
24
25
26
27
28
29
30
31
32
33
34
35
36
37
38
39
40
41
42
43
44
45
46
47angular.module("sportsStoreAdmin")
.constant("productUrl", "/products/")
.config(function($httpProvider) {
// 此处通过调用模块的config方法改变所有ajax请求的默认设置
// 并且声明$httpProvider依赖
$httpProvider.defaults.withCredentials = true;
})
.controller("productCtrl", function ($scope, $resource, productUrl) {
// 本控制器最关键处:创建提供权限访问RESTful API的访问对象,即productsResource
// $resource方法的第一个参数定义了URL格式,其中:id与第二个参数映射
// 即:若数据对象中有id属性,则将其添加到请求url中
// 返回的productsResource对象有CRUD的各种方法,用于操作服务器数据
$scope.productsResource = $resource(productUrl + ":id", { id: "@id" });
// 获取所有产品方法
$scope.listProducts = function () {
$scope.products = $scope.productsResource.query();
}
$scope.deleteProduct = function (product) {
product.$delete().then(function () {
$scope.products.splice($scope.products.indexOf(product), 1);
});
}
$scope.createProduct = function (product) {
new $scope.productsResource(product).$save().then(function (newProduct) {
$scope.products.push(newProduct);
$scope.editedProduct = null;
});
}
$scope.updateProduct = function (product) {
product.$save();
$scope.editedProduct = null;
}
$scope.startEdit = function (product) {
$scope.editedProduct = product;
}
$scope.cancelEdit = function () {
$scope.editedProduct = null;
}
// 每次进入该控制器(即切换到控制器所在的视图时)立即调用获取所有产品
$scope.listProducts();
});