AngularJS入门笔记-14-表单

Author Avatar
KING May 20, 2017 Mar 29, 2018 UPDATED

绝大多数Web应用必不可少的就是表单了,ng对表单提供了从数据绑定到验证的不同程度的支持,提供一些额外的属性对表单增强。

  • form元素的novalidate属性,使用特殊变量($valid)可得到某个元素或整个表单的有效性。
  • 提供校验结果的视觉提示,使用ng校验器的css类
  • 延迟校验反馈,可添加锁住校验反馈的变量
  • 对input元素执行复杂校验
  • 使用ng-true-value和ng-false-value属性,通过复选框绑定控制模型属性值
  • 校验textarea元素
  • 通过ng-option对select元素生成option选项

除了创建控制器时,对显示定义的模型属性进行操作,通过双向数据绑定会隐式的在数据模型中创建新的对象或属性,这种特性在使用表单元素收集信息时非常有用。

添加新对象到模型

如下demo就使用隐式创建的方式创建新对象到模型中。

1
2
3
4
5
6
7
8
9
10
11
12
13
14
15
16
17
18
19
20
21
22
23
24
25
26
27
28
29
30
31
32
33
34
35
36
37
38
39
40
41
42
43
44
45
46
47
48
49
50
51
52
53
54
55
56
57
58
59
60
61
62
63
64
65
66
67
68
69
70
71
72
73
74
75
76
77
<html ng-app="exampleApp">
<head>
<title>Forms</title>
<script src="angular.js"></script>
<link href="bootstrap.css" rel="stylesheet" />
<link href="bootstrap-theme.css" rel="stylesheet" />
<script>
angular.module("exampleApp", [])
.controller("defaultCtrl", function ($scope) {
$scope.todos = [
{ action: "Get groceries", complete: false },
{ action: "Call plumber", complete: false },
{ action: "Buy running shoes", complete: true },
{ action: "Buy flowers", complete: false },
{ action: "Call family", complete: false }];

$scope.addNewItem = function (newItem) {
$scope.todos.push({
action: newItem.action + " (" + newItem.location + ")",
complete: false
});
};
});
</script>
</head>
<body>
<div id="todoPanel" class="panel" ng-controller="defaultCtrl">

<h3 class="panel-header">
To Do List
<span class="label label-info">
{{ (todos | filter: {complete: 'false'}).length}}
</span>
</h3>

<div class="row">
<div class="col-xs-6">
<div class="well">
<div class="form-group row">
<label for="actionText">Action:</label>
<input id="actionText" class="form-control"
ng-model="newTodo.action">
</div>
<div class="form-group row">
<label for="actionLocation">Location:</label>
<select id="actionLocation" class="form-control"
ng-model="newTodo.location">
<option>Home</option>
<option>Office</option>
<option>Mall</option>
</select>
</div>
<button class="btn btn-primary btn-block"
ng-click="addNewItem(newTodo)">
Add
</button>
</div>
</div>

<div class="col-xs-6">
<table class="table">
<thead>
<tr><th>#</th><th>Action</th><th>Done</th></tr>
</thead>
<tr ng-repeat="item in todos">
<td>{{$index + 1}}</td>
<td>{{item.action}}</td>
<td>
<input type="checkbox" ng-model="item.complete">
</td>
</tr>
</table>
</div>
</div>
</div>
</body>
</html>

通过表单在模型中创建新对象

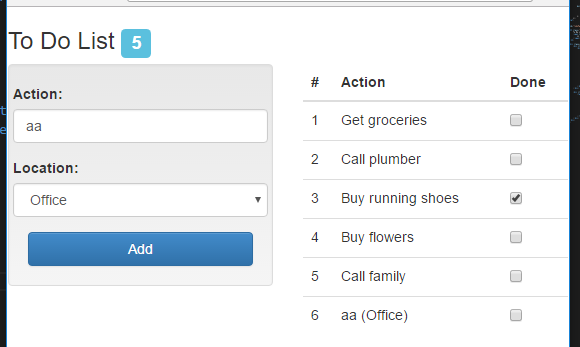
在上述示例中在input上绑定了一个newTodo.action,在select上绑定newTodo.location,然后在button上绑定点击事件,将newTodo对象传入addNewItem函数中。

在控制器中的addNewItem函数,虽然可以通过直接访问$scope.newTodo实现添加新任务,而不是接收一个对象作为参数,看似多此一举,但实际上,接收对象参数的方法能在视图中多次复用,尤其是在需要考虑到控制器的继承关系时非常重要。

在页面被初次加载时,newTodo对象以及action和location属性并不存在,模型中仅有的数据是已有的待办事项,这些数据是控制器函数中硬编码写死的。

而在input元素或selcet元素改变时,ng将自动创建newTodo对象并能更新这个对象,ng这种灵活创建新对象和属性的方式非常有利于快速开发并修改模型,以简洁的方式调用并处理数据。

但这种隐式创建对象的方式也有问题,比如若一开始没有输入也没有选择的时候直接点击add按钮,会报错:

1
TypeError: Cannot read property 'action' of undefined

这种问题就是由于控制器中的方法函数视图访问一个ng尚未创建出的对象的属性导致的,而对象只有在(即输入框、选择框被改变后)触发双向绑定指令后才能被创建,考虑到这种情况(编写程序时很大可能不会考虑到),需要对方法参数进行检查。

1
2
3
4
5
6
7
8
9
10
$scope.addNewItem = function (newItem) {
if (angular.isDefined(newItem) && angular.isDefined(newItem.action)
&& angular.isDefined(newItem.location)) {

$scope.todos.push({
action: newItem.action + " (" + newItem.location + ")",
complete: false
});
}
};

其实更好的方法是对表单进行校验,尤其是程序在使用用户输入的数据之前需要进行检查。这里需要提到一些用户交互和体验以及程序功能上的平衡或取舍问题。

为什么用户会输入错误的数据?

数据输入不合理,很多时候其实算是开发者的锅,很多数据不规则的问题在一定程度上可通过细致的设计和开发来避免。

  1. 用户不理解要求输入的是什么,这种情况往往是由于提示不够明确,或仅仅是用户没有注意到。为了减少用户的混淆和疏忽,可采取一些方法,比如尽可能早的要求填写那些必要的信息,同时组织表单减少混淆,让标签语义更清晰,遵循一些表单元素的惯用顺序等。
  2. 用户不想提供要求的数据,比如一些用户想尽快完成填表,输入尽量少的数据,或者就不愿提供精确的数据,比如一些私人信息。
  3. 用户没有该要求的数据,比如地区,有一些地区分为三级,但是该用户所在地区只有两级,没有第三级。
  4. 仅仅是简简单单的用户输入错误,这种情况其实最常见,只要是需要输入的地方,都有可能输入错误数据,这种情况应该考虑如何有效减少用户输入而不是处理这种错误。

如下验证表单的示例:

1
2
3
4
5
6
7
8
9
10
11
12
13
14
15
16
17
18
19
20
21
22
23
24
25
26
27
28
29
30
31
32
33
34
35
36
37
38
39
40
41
42
43
44
45
46
47
48
49
50
51
52
53
54
<html ng-app="exampleApp">
<head>
<title>Forms</title>
<script src="angular.js"></script>
<link href="bootstrap.css" rel="stylesheet" />
<link href="bootstrap-theme.css" rel="stylesheet" />
<script>
angular.module("exampleApp", [])
.controller("defaultCtrl", function ($scope) {
$scope.addUser = function (userDetails) {
$scope.message = userDetails.name
+ " (" + userDetails.email + ") (" + userDetails.agreed + ")";
}

$scope.message = "Ready";
});
</script>
</head>
<body>
<div id="todoPanel" class="panel" ng-controller="defaultCtrl">
<form name="myForm" novalidate ng-submit="addUser(newUser)">
<div class="well">
<div class="form-group">
<label>Name:</label>
<input name="userName" type="text" class="form-control"
required ng-model="newUser.name">
</div>
<div class="form-group">
<label>Email:</label>
<input name="userEmail" type="email" class="form-control"
required ng-model="newUser.email">
</div>
<div class="checkbox">
<label>
<input name="agreed" type="checkbox"
ng-model="newUser.agreed" required>
I agree to the terms and conditions
</label>
</div>
<button type="submit" class="btn btn-primary btn-block"
ng-disabled="myForm.$invalid">
OK
</button>
</div>
<div class="well">
Message: {{message}}
<div>
Valid: {{myForm.$valid}}
</div>
</div>
</form>
</div>
</body>
</html>

表单验证

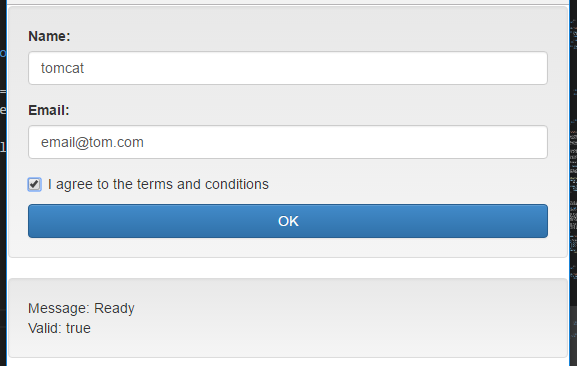
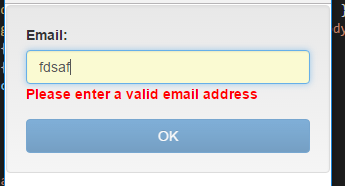
上述demo在浏览器加载的时候OK按钮是被禁用的,只有文本框内输入合法的值(邮箱会被验证)并勾选复选框后Ok按钮才会变为可用可点击状态,允许用户提交表单。

要向通过ng处理到form元素,并自动设置一些表单元素的校验工作,需要设置一些属性,比如form表单的name属性。

form表单元素其实只是在表单校验的时候需要,若是普通的双向绑定,即使不用form元素也没问题。

ng使用标准html元素来配置表单校验,但是由于浏览器对这些标准html属性的行为不一致,所以需要先使用novalidate属性禁用表单的默认验证,这个属性是定义在html5规范中的,表示不需要浏览器验证表单。

ng-submit指令为表单提交事件指定响应行为,将在表单提交时触发。

input元素的type值类型:

  • checkbox 复选框
  • radio 单选框
  • text 文本
  • email 邮件,H5加入
  • number 数值,H5加入
  • url URL地址,H5加入

ng用一些特殊变量来增强表单元素,可以这些变量检查表单的单个元素或者整体有效性

  • $pristine 若用户没有与元素/表单交互返回true
  • $dirty 若用户与元素/表单交互返回true
  • $valid 当元素/表单的校验有效返回true
  • $invalid 当元素/表单校验无效返回true
  • $error 提供校验错误的详细信息

两种ng校验信息展示方法

ng为报告实时校验信息提供两种机制:css类和变量。

ng校验用到的css类,当符合规则时,ng将自动添加如下的css类名到元素/表单上:

  • ng-pristine 若用户没有与元素/表单交互
  • ng-dirty 若用户与元素/表单交互
  • ng-valid 当元素/表单的校验有效
  • ng-invalid 当元素/表单校验无效

只要使用ng去验证,所以可以直接定义css规则即可展示不同状态的表单,也可以配合ng-class指令使用。

在ng中,使用变量作为验证信息展示媒介时,使用表单验证一定要添加name值,无论是表单还是元素,因为ng是通过name属性来自动获取该元素的,比如myForm.userEmail.$error.email

1
2
3
4
5
6
7
8
9
10
11
12
13
14
15
16
17
18
19
20
21
22
23
24
25
26
27
28
29
30
31
32
33
34
35
36
37
38
39
40
41
42
43
44
45
46
47
48
49
50
51
<html ng-app="exampleApp">
<head>
<title>Forms</title>
<script src="angular.js"></script>
<link href="bootstrap.css" rel="stylesheet" />
<link href="bootstrap-theme.css" rel="stylesheet" />
<script>
angular.module("exampleApp", [])
.controller("defaultCtrl", function ($scope) {
$scope.addUser = function (userDetails) {
$scope.message = userDetails.name
+ " (" + userDetails.email + ") (" + userDetails.agreed + ")";
}

$scope.message = "Ready";
});
</script>
<style>
form .ng-invalid-required.ng-dirty { background-color: lightpink; }
form .ng-invalid-email.ng-dirty { background-color: lightgoldenrodyellow; }
form .ng-valid.ng-dirty { background-color: lightgreen; }
span.summary.ng-invalid { color: red; font-weight: bold; }
span.summary.ng-valid { color: green; }
div.error {color: red; font-weight: bold;}
</style>
</head>
<body>
<div id="todoPanel" class="panel" ng-controller="defaultCtrl">
<form name="myForm" novalidate ng-submit="addUser(newUser)">
<div class="well">
<div class="form-group">
<label>Email:</label>
<input name="userEmail" type="email" class="form-control"
required ng-model="newUser.email">
<div class="error"
ng-show="myForm.userEmail.$invalid && myForm.userEmail.$dirty">
<span ng-show="myForm.userEmail.$error.email">
Please enter a valid email address
</span>
<span ng-show="myForm.userEmail.$error.required">
Please enter a value
</span>
</div>
</div>
<button type="submit" class="btn btn-primary btn-block"
ng-disabled="myForm.$invalid">OK</button>
</div>
</form>
</div>
</body>
</html>

使用变量获取验证表单信息

上述变量方法将所有错误的类型和提示信息都提前写入到html中,这样不是很好看,而且很冗余,不方便,这时,就可以通过控制器将这些验证提示信息整合起来。

1
2
3
4
5
6
7
8
9
10
11
12
13
14
15
16
17
18
19
20
21
22
23
24
25
26
27
28
29
30
31
32
33
34
35
36
37
38
39
40
41
42
43
44
45
46
47
48
49
50
51
52
53
54
55
56
57
<html ng-app="exampleApp">
<head>
<title>Forms</title>
<script src="angular.js"></script>
<link href="bootstrap.css" rel="stylesheet" />
<link href="bootstrap-theme.css" rel="stylesheet" />
<script>
angular.module("exampleApp", [])
.controller("defaultCtrl", function ($scope) {
$scope.addUser = function (userDetails) {
$scope.message = userDetails.name
+ " (" + userDetails.email + ") (" + userDetails.agreed + ")";
}

$scope.message = "Ready";

$scope.getError = function (error) {
if (angular.isDefined(error)) {
if (error.required) {
return "Please enter a value";
} else if (error.email) {
return "Please enter a valid email address";
}
}
}

});
</script>

<style>
form .ng-invalid-required.ng-dirty { background-color: lightpink; }
form .ng-invalid-email.ng-dirty { background-color: lightgoldenrodyellow; }
form .ng-valid.ng-dirty { background-color: lightgreen; }
span.summary.ng-invalid { color: red; font-weight: bold; }
span.summary.ng-valid { color: green; }
div.error {color: red; font-weight: bold;}
</style>
</head>
<body>
<div id="todoPanel" class="panel" ng-controller="defaultCtrl">
<form name="myForm" novalidate ng-submit="addUser(newUser)">
<div class="well">
<div class="form-group">
<label>Email:</label>
<input name="userEmail" type="email" class="form-control"
required ng-model="newUser.email">
<div class="error" ng-show="myForm.userEmail.$invalid && myForm.userEmail.$dirty">
{{getError(myForm.userEmail.$error)}}
</div>
</div>
<button type="submit" class="btn btn-primary btn-block"
ng-disabled="myForm.$invalid">OK</button>
</div>
</form>
</div>
</body>
</html>

直到现在,ng提供了一种实时验证的方法,每当用户与表单交互时就会验证,这种方式其实并不是特别常用,因为这会让用户被验证信息弄得很烦。

这时,可以考虑使用不直接将验证情况反馈出来,而是通过ng-class在form上绑定一个ng-invalid的类,然后在submit时在去显示验证信息。

1
2
3
4
5
6
7
8
9
10
11
12
13
14
15
16
17
18
19
20
21
22
23
24
25
26
27
28
29
30
31
32
33
34
35
36
37
38
39
40
41
42
43
44
45
46
47
48
49
50
51
52
53
54
55
56
57
58
59
<html ng-app="exampleApp">
<head>
<title>Forms</title>
<script src="angular.js"></script>
<link href="bootstrap.css" rel="stylesheet" />
<link href="bootstrap-theme.css" rel="stylesheet" />
<script>
angular.module("exampleApp", [])
.controller("defaultCtrl", function ($scope) {

$scope.addUser = function (userDetails) {
if (myForm.$valid) {
$scope.message = userDetails.name
+ " (" + userDetails.email + ") ("
+ userDetails.agreed + ")";
} else {
$scope.showValidation = true;
}
}

$scope.message = "Ready";

$scope.getError = function (error) {
if (angular.isDefined(error)) {
if (error.required) {
return "Please enter a value";
} else if (error.email) {
return "Please enter a valid email address";
}
}
}
});
</script>
<style>
form.validate .ng-invalid-required.ng-dirty { background-color: lightpink; }
form.validate .ng-invalid-email.ng-dirty {
background-color: lightgoldenrodyellow; }
div.error { color: red; font-weight: bold; }
</style>
</head>
<body>
<div id="todoPanel" class="panel" ng-controller="defaultCtrl">
<form name="myForm" novalidate ng-submit="addUser(newUser)"
ng-class="showValidation ? 'validate' : ''">
<div class="well">
<div class="form-group">
<label>Email:</label>
<input name="userEmail" type="email" class="form-control"
required ng-model="newUser.email">
<div class="error" ng-show="showValidation">
{{getError(myForm.userEmail.$error)}}
</div>
</div>
<button type="submit" class="btn btn-primary btn-block">OK</button>
</div>
</form>
</div>
</body>
</html>

ng在input元素上提供了额外的属性:

  • ng-change 指定表达式,当元素内容改变时计算求值
  • ng-minlength 最小字符数
  • ng-maxlength
  • ng-pattern 将内容用正则表达式验证
  • ng-required 通过数据绑定required属性值
    注,当type属性设置为email,number,url时就不用设置ng-pattern了

当type为checkbox时,ng提供的额外属性

  • ng-true-value 被勾选时绑定表达式的值
  • ng-false-value 取消勾选时绑定表达式的值

关于select的使用

select有一些特别需要注意的地方,这一点与其他表单元素不同,需要特殊对待

1
2
3
4
5
6
7
8
9
10
11
12
13
14
15
16
17
18
19
20
21
22
23
24
25
26
27
28
29
30
31
32
33
34
35
36
37
<html ng-app="exampleApp">
<head>
<title>Forms</title>
<script src="angular.js"></script>
<link href="bootstrap.css" rel="stylesheet" />
<link href="bootstrap-theme.css" rel="stylesheet" />
<script>
angular.module("exampleApp", [])
.controller("defaultCtrl", function ($scope) {
$scope.todos = [
{ id: 100, action: "Get groceries", complete: false },
{ id: 200, action: "Call plumber", complete: false },
{ id: 300, action: "Buy running shoes", complete: true }];
});
</script>
</head>
<body>
<div id="todoPanel" class="panel" ng-controller="defaultCtrl">
<form name="myForm" novalidate>
<div class="well">
<div class="form-group">
<label>Select an Action:</label>
<select ng-model="selectValue"
ng-options="item.id as item.action for item in todos">
<option value="">(Pick One)</option>
</select>

</div>
</div>

<div class="well">
<p>Selected: {{selectValue || 'None'}}</p>
</div>
</form>
</div>
</body>
</html>

select选项

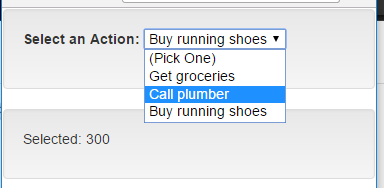
select中的<option value="">(Pick One)</option>是作为默认选项存在的

同时select也提供了分组功能,只要修改迭代即可

1
item.id as item.action group by item.place for item in todos